
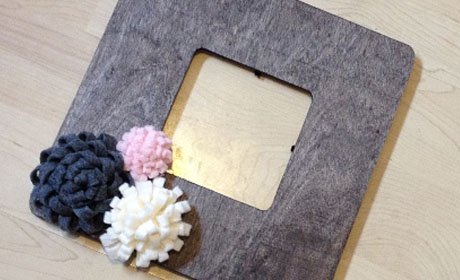
While wandering around Wal-Mart, we came across this plain, wood picture frame in the crafts section. It was less than $1 and we couldn’t pass up the chance to turn it into something fabulous! I knew I had a few things around the house to complete this DIY picture frame project.
What You Need
- Wood picture frame
- Wood stain
- Paint brush
- Felt (or other fabric)
- Craft glue
- Scissors
What You Do
- Stain the picture frame with one thing layer of the stain using your paint brush.
- While the frame is drying, cut strips of your fabric at about 1 – 2 inches wide and about 12 inches long.
- Take a strip of the fabric and put a thin line of craft glue along the length of the edge of the strip.
- Fold the strip length ways in half to glue the two edges together, leaving the middle unglued … allow to dry.
- Once it’s dry, cut quarter-inch strips from the folded edge to about the glued edge … don’t get too close or cut it all the way off. Repeat all the way down the strip of fabric.
- After you’ve cut strips into the fabric, place a drop of glue at one end of the strip.
- Begin rolling the strip up, placing another drop of glue every so often, to form a flower.
- When you’ve rolled it all the way up, be sure to end with a dab of glue and allow it to dry. Then you can fluff the folded strips.
- Repeat steps for the strip of fabric to another one or two pieces.
- Once everything is dry, you can now glue those to the stained wood frame.